Be Excellent To Each Other

And, you know, party on. Dude.

All times are UTC [ DST ]


Reply to topic  [ 53 posts ]  Go to page 1, 2  Next
Author Message
 Post subject: Nervy-Pete's Photography Class
PostPosted: Tue Apr 17, 2012 16:13 
User avatar
Excellent Member

Joined: 30th Mar, 2008
Posts: 8019
Location: Cardiff
The great adage is to ‘keep it simple, stupid’. This is why the quiet-loud-quiet awesome of the Pixies was greater than the latter tedious noodling of Pink Floyd. It’s a rule that carries over into photography. Just as camera designers try to remove as much of the camera as possible from between you and the capturing of an image, so a good photograph strips itself down until only the important elements are instinctively read by the viewer. Equally, so increased knowledge of photography reduces the number of buttons you’ll have to twiddle and the more you can concentrate on the creative side, leading to a simpler, more enjoyable experience.

In this short course I’ll be passing on in a suitably pompous manner a few of the fundamentals of photography. My apologies to those who know these basics already, such as Zardoz, Decca and MarkG.

First of all we shall cover exposure.

Now I could talk about Ansel Adams and his celebrated zone system, but to be honest I’ve never been able to remember how that works - so I’ll keep this simple. The basic key to good exposure is in capturing as much shadow detail as possible without blowing out the highlights, but there’s more to it to that. The exposure of an image not only effects detail but the transition of tonal ranges, the richness of colour and the amount of irritatingly grainy noise that might appear.

Now there’s a very important feature on digital cameras that is vital to learn. This is called the ‘Histogram’. Take a photograph. Now, bring up the display to look at it again. There should be an option on your camera to review the basic data of the shot (f/stop and shutter speed) and there should be a certain little graph included. This should be a rectangular box that shows white hills and peaks on a black background. Now, what is this?

Basically this is a chart that shows the amount of light and dark pixels in the photograph. It runs from the deepest black on the extreme left to the brightest-burnt out white on the extreme right, with the width in between being a smooth transition between both. Each pixel wide value of brightness has a vertical line, the higher the line the greater proportion of pixels in the image sharing that value. What this usually visually translates as is a peak, or a series of peaks and troughs. But how do we read this?

Say we take a photograph of a beach on a sunny day. The pixels will be brighter and so we will have our peak to the far right hand side. But the sun may be beaming down on an over-exposed sky which washes out the blue with bright white light. The histogram would reveal this as a sharp spike of pixels crammed dead against the right border. Now, if you were to reduce the exposure by increasing shutter speed or closing the aperture, the peak showing the bright beach pixels would shift further to the centre, and the sky would darken to a punchy blue bringing those burnt out right-side hugging spikes into a gentler general right hand peak.

The exact opposite applies to areas so unexposed to be black. In general however it is better to have areas of blackness than areas of burnt out whiteness in an image. Blackness can indicate mystery or help define, but the eye revolts at a pure white splodge.

So, let us say we now have one gently humped nice even exposure in the centre of the image for our landscape. This is perfectly acceptable. However, you may notice that the colours are a little dull and the tonal ranges muddy or blotchy. (A tonal range is the smoothness and detail in the transition between colours and shades.) It turns out that images such as landscapes and portraits tend to look better with the hill or peak on the histogram within or edging into the right hand third. Colours are richer and skin looks more natural.

Of course, you won't always want this sort of exposure. A moody shot of the Yorkshire moors will be different, as would an evocative portrait of a crinkle-faced West-Indian. But it is a good starting point, and it is always easier and safer to over expose a little and then decrease, so long as the highlights aren’t blown.

"But hey, Pete! Why don't we just look at the LCD image to see whether it looks right or not?" Well, it lies you see. This was a painful lesson it took me some time to learn, but the LCD preview image is brighter than the actual image you take by a significant degree. This is true of ALL cameras. I don't know why they make 'em like this, whether the punchy image is to help shift stock in Currys or whether it has a sensible reason such as helping combat strong sun glare or something. All I know is that what looks like a bright scene will probably come out a tad gloomy, and a gloomy scene come out hopelessly unexposed. Check the histogram, people.

So, how do you quickly achieve this in practice? Well, for my money the best way is as follows:

First of all, you’ll want to be shooting in Aperture-Priority mode. This allows you to set the aperture leaving the camera to choose the shutter speed that will afford the best exposure. The aperture controls depth of focus. This is the area in sharp focus that recedes away and towards you from any given point you focus your camera on. Shallow focus is great for portraits, deep focus best for landscapes – but more on that later.

So, you have your aperture set. Take a shot. Greatly underexposed or overexposed? You might want to adjust your ISO. This is the sensitivity of your camera to light. A higher ISO lets in more light, but means more noise. However, modern cameras should be fine with an ISO up to 800 on a correctly exposed image. Beware, an underexposed image – even intentionally so – will show more noise at a higher ISO than an overexposed image. Also, colours and tones aren’t as punchy or nicely rendered at higher ISO’s.

So let’s say you were overexposed. You reduce the ISO. Now just a touch underexposed. What do you do?

Head to the Exposure Compensation button! This is usually a little button that looks like this: [+/-] Hold it down and twirl the control dial, you’ll see the exposure change in thirds of a stop. (A full stop halves the amount of light your camera receives, incidentally.) Let’s tweak it twice – it should now read, + 0.7. Take the shot again and see if that does for you.

The beauty of the exposure compensation button is that it allows you to be rough and ready and respond quickly to changes in lighting. If it suddenly gets cloudy just brighten things up a couple of notches. Some cameras, such as the Nikon, have a tendency to over-expose a touch, which means I often have mine set to -0.7. Knowing what works comes with practice.

Now we move onto shutter speed. I’ll be quick on this one. For moving objects you ideally want a speed of at least 1/250. For slow and lazy people you can get away with 1/100. For still objects the only limitation to sharpness is the focal length of your lens. To get a sharp image you traditionally have to have a shutter speed at least matching the focal length of your lens. Say you’re shooting wide angle at 24mm. You’ll need a shutter speed above that, say 1/25. Now, unless you’re obscenely rich – possibly Grim… - you won’t be using a medium format camera as a point and shoot. You’ll be using an APS-C format camera. This is important as the cropped sensor multiplies the focal length by around 1.5. So if you’re shooting with a 50mm lens you’ll have to shoot at least at 1/80. An 85mm lens at 160, and so on.

If you have a VR lens (which I don’t) you can play a little fast and loose with this, but it’s a good rule to remember. Usually you’ll have an acceptable shutter speed, which is why this is less important excepting in sports and wildlife photography. However, the deliberate blurring with shutter speeds can have tremendous visual bonuses, even when shooting with people as subjects. However, I’m rubbish at thinking creatively in shutter speeds, so expect a sheepish article on that one.

Oddly, people running towards you can have a lower shutter speed than people running perpendicular. Curious, that.

So, that’s sharpness and correct exposure covered. The more confident you feel about what you need, the less time you’ll be fretting on what settings you should choose and the more time you can spend getting creative. With practice, you’ll just instinctively know what’s roughly required by any given scene. I apologise for this being a little patronising and dry-as-dust, but it is really important to know. After a couple more technical sections I’ll begin on the simple things you can do to make things more visually interesting before moving on to basic image manipulation and then the deeper concepts behind what makes a good photograph – not including breasts.

Thanks for reading. Any questions at all I’ll cover in between articles so don’t limit your queries please. It’ll jog me to include more stuff in future ones. Next up will be aperture and focusing. Cheerio!

[Edited for point about the LCD image.]

_________________
"Peter you've lost the NEWS!"

Bored? Why not look at some pretty pictures on my photography blog? Here: http://petetakespictures.com

Come & See My Flickery Pics Here: http://www.flickr.com/photos/nervouspete/


Top
 Profile  
 
 Post subject: Re: Nervy-Pete's Photography Class
PostPosted: Tue Apr 17, 2012 16:17 
User avatar
Honey Boo Boo

Joined: 28th Mar, 2008
Posts: 12328
Location: Tronna, Canandada
Your talents continue to be wasted here, PartyPete. Excellent stuff.


Top
 Profile  
 
 Post subject: Re: Nervy-Pete's Photography Class
PostPosted: Tue Apr 17, 2012 16:20 
User avatar
Master of dodgy spelling....

Joined: 25th Sep, 2008
Posts: 22544
Location: shropshire, uk
I will read that in the hotel tonight...

_________________
MetalAngel wrote:
Kovacs: From 'unresponsive' to 'kebab' in 3.5 seconds


Top
 Profile  
 
 Post subject: Re: Nervy-Pete's Photography Class
PostPosted: Tue Apr 17, 2012 16:58 
User avatar
Skillmeister

Joined: 27th Mar, 2008
Posts: 27023
Location: Felelagedge Wedgebarge, The River Tib
Excellent. Cheers Pete!

_________________
Washing Machine: Fine. Kettle: Needs De-scaling. Shower: Brand new. Boiler: Fine.
Archimedes Hotdog Rhubarb Niner Zero Niner.


Top
 Profile  
 
 Post subject: Re: Nervy-Pete's Photography Class
PostPosted: Tue Apr 17, 2012 17:12 
SupaMod
User avatar
Commander-in-Cheese

Joined: 30th Mar, 2008
Posts: 49232
Great stuff, Pete. For any Canonistas reading, VR is the same thing as IS.

_________________
GoddessJasmine wrote:
Drunk, pulled Craster's pork, waiting for brdyime story,reading nuts. Xz


Top
 Profile  
 
 Post subject: Re: Nervy-Pete's Photography Class
PostPosted: Tue Apr 17, 2012 17:18 
SupaMod
User avatar
Est. 1978

Joined: 27th Mar, 2008
Posts: 69509
Location: Your Mum
Craster wrote:
Great stuff, Pete. For any Canonistas reading, VR is the same thing as IS.

"Something I don't have" then - understood!

_________________
Grim... wrote:
I wish Craster had left some girls for the rest of us.


Top
 Profile  
 
 Post subject: Re: Nervy-Pete's Photography Class
PostPosted: Tue Apr 17, 2012 20:43 
User avatar
Unpossible!

Joined: 27th Jun, 2008
Posts: 38460
Make-not-wobbly switch.

Knowlton me as the seasick switch

edit: 'Knowlton'? Should be 'known to'


Top
 Profile  
 
 Post subject: Re: Nervy-Pete's Photography Class
PostPosted: Tue Apr 17, 2012 23:27 
User avatar

Joined: 30th Mar, 2008
Posts: 14150
Location: Shropshire, UK
Craster wrote:
Great stuff, Pete. For any Canonistas reading, VR is the same thing as IS.

As advertised by Michael J. Fox.

Good stuff Pete :)


Top
 Profile  
 
 Post subject: Re: Nervy-Pete's Photography Class
PostPosted: Wed Apr 18, 2012 8:53 
User avatar
Level 6 Laser Lotus

Joined: 26th Aug, 2010
Posts: 2069
Nice Pete! Thanks, will try to get out with the Camera and have a play later

_________________
Shin: a device for finding furniture in the dark

If at first, the idea is not absurd, then there is no hope for it


Top
 Profile  
 
 Post subject: Re: Nervy-Pete's Photography Class
PostPosted: Wed Apr 18, 2012 14:54 
User avatar

Joined: 30th Mar, 2008
Posts: 16559
NervousPete wrote:
So let’s say you were overexposed. You reduce the ISO. Now just a touch underexposed. What do you do?

Head to the Exposure Compensation button! This is usually a little button that looks like this: [+/-] Hold it down and twirl the control dial, you’ll see the exposure change in thirds of a stop. (A full stop halves the amount of light your camera receives, incidentally.) Let’s tweak it twice – it should now read, + 0.7. Take the shot again and see if that does for you.

The beauty of the exposure compensation button is that it allows you to be rough and ready and respond quickly to changes in lighting. If it suddenly gets cloudy just brighten things up a couple of notches. Some cameras, such as the Nikon, have a tendency to over-expose a touch, which means I often have mine set to -0.7. Knowing what works comes with practice.

I have to say that I have never once used exposure compensation. I have noticed a couple of times that shots keep coming out over-exposed and have just made mental note to adjust for it by a couple on notches on the light meter. Is this in effect doing the same thing as the exposure compensation or does it do something else?


Top
 Profile  
 
 Post subject: Re: Nervy-Pete's Photography Class
PostPosted: Wed Apr 18, 2012 14:58 
User avatar
baron of techno

Joined: 30th Mar, 2008
Posts: 24136
Location: fife
markg wrote:
NervousPete wrote:
So let’s say you were overexposed. You reduce the ISO. Now just a touch underexposed. What do you do?

Head to the Exposure Compensation button! This is usually a little button that looks like this: [+/-] Hold it down and twirl the control dial, you’ll see the exposure change in thirds of a stop. (A full stop halves the amount of light your camera receives, incidentally.) Let’s tweak it twice – it should now read, + 0.7. Take the shot again and see if that does for you.

The beauty of the exposure compensation button is that it allows you to be rough and ready and respond quickly to changes in lighting. If it suddenly gets cloudy just brighten things up a couple of notches. Some cameras, such as the Nikon, have a tendency to over-expose a touch, which means I often have mine set to -0.7. Knowing what works comes with practice.

I have to say that I have never once used exposure compensation. I have noticed a couple of times that shots keep coming out over-exposed and have just made mental note to adjust for it by a couple on notches on the light meter. Is this in effect doing the same thing as the exposure compensation or does it do something else?


Same as you mark, I've never used that. Just adjust the aperture or time to compensate. Is it more for use in auto mode?
edit: oh, and it's a smaller adjustment than a full stop, fair enough.
edit edit: excellent thread Pete, thanks!


Top
 Profile  
 
 Post subject: Re: Nervy-Pete's Photography Class
PostPosted: Wed Apr 18, 2012 15:03 
SupaMod
User avatar
Commander-in-Cheese

Joined: 30th Mar, 2008
Posts: 49232
Also, you may not want to adjust the aperture or shutter speed.

_________________
GoddessJasmine wrote:
Drunk, pulled Craster's pork, waiting for brdyime story,reading nuts. Xz


Top
 Profile  
 
 Post subject: Re: Nervy-Pete's Photography Class
PostPosted: Wed Apr 18, 2012 15:07 
User avatar

Joined: 30th Mar, 2008
Posts: 16559
I think you still have to, though. If I'm understanding it correctly all that exposure compensation does is move the middle point of the light meter.


Top
 Profile  
 
 Post subject: Re: Nervy-Pete's Photography Class
PostPosted: Wed Apr 18, 2012 15:09 
SupaMod
User avatar
Commander-in-Cheese

Joined: 30th Mar, 2008
Posts: 49232
I thought exp comp was all done on the sensor, rather than actually altering the light coming through the lens.

_________________
GoddessJasmine wrote:
Drunk, pulled Craster's pork, waiting for brdyime story,reading nuts. Xz


Top
 Profile  
 
 Post subject: Re: Nervy-Pete's Photography Class
PostPosted: Wed Apr 18, 2012 15:20 
User avatar

Joined: 30th Mar, 2008
Posts: 16559
Adjusting exposure on the sensor is just ISO, though surely. I've just been having a read around and I don't think it actually does anything itself. It'll just tell the camera (or you, in manual mode) to adjust whatever settings it is in control of in order to over or under-expose away from what is normal by the amount you give it.

I shall try some experimenting in a bit.


Top
 Profile  
 
 Post subject: Re: Nervy-Pete's Photography Class
PostPosted: Wed Apr 18, 2012 15:26 
User avatar
Hibernating Druid

Joined: 27th Mar, 2008
Posts: 49139
Location: Standing on your mother's Porsche
It's just partial ƒ stop increments, isn't it?

_________________
SD&DG Illustrated! Behance Bleep Bloop

'Not without talent but dragged down by bass turgidity'


Top
 Profile  
 
 Post subject: Re: Nervy-Pete's Photography Class
PostPosted: Wed Apr 18, 2012 15:42 
User avatar

Joined: 30th Mar, 2008
Posts: 32619
How exposure compensation works depends on the mode. The camera can only be varying shutter speed, aperture, and ISO (sensor amplification) to change the exposure. In Av, it'll change shutter and ISO, for example. In M it'll change ISO unless you also lock that down, in which case it won't do anything. And so on.


Top
 Profile  
 
 Post subject: Re: Nervy-Pete's Photography Class
PostPosted: Wed Apr 18, 2012 15:51 
User avatar
Excellent Member

Joined: 30th Mar, 2008
Posts: 8019
Location: Cardiff
What DocG says. If you're working on aperture priority, it'll adjust the automatic shutter speed to be slower or faster. If you're working on shutter priority, it'll adjust the aperture, or f/stop. I don't recommend working with auto-ISO though, as it risks impairing quality by introducing noise.

If you go full manual you can set both shutter speed and aperture and not thus with exposure compensation. It's a good but tough learning curve going that way, which I did do. But I shoot mainly aperture-priority now. :)

_________________
"Peter you've lost the NEWS!"

Bored? Why not look at some pretty pictures on my photography blog? Here: http://petetakespictures.com

Come & See My Flickery Pics Here: http://www.flickr.com/photos/nervouspete/


Top
 Profile  
 
 Post subject: Re: Nervy-Pete's Photography Class
PostPosted: Wed Apr 18, 2012 15:53 
User avatar
Heavy Metal Tough Guy

Joined: 31st Mar, 2008
Posts: 6512
Note to self : Get better camera.

Noto to self 2 : Once I;ve got better camera, don't let the wife near it or she'll break it. Again.


Top
 Profile  
 
 Post subject: Re: Nervy-Pete's Photography Class
PostPosted: Wed Apr 18, 2012 16:01 
User avatar

Joined: 30th Mar, 2008
Posts: 16559
NervousPete wrote:
But I shoot mainly aperture-priority now. :)

WHAT? I've been shooting in nothing but manual because that's what everyone told me I must do.


Top
 Profile  
 
 Post subject: Re: Nervy-Pete's Photography Class
PostPosted: Wed Apr 18, 2012 16:07 
SupaMod
User avatar
Commander-in-Cheese

Joined: 30th Mar, 2008
Posts: 49232
I'm the same as Pete. You control the aperture and ISO - do you really care what the shutter speed is doing as long as you're getting high enough for the shot you want to take?

_________________
GoddessJasmine wrote:
Drunk, pulled Craster's pork, waiting for brdyime story,reading nuts. Xz


Top
 Profile  
 
 Post subject: Re: Nervy-Pete's Photography Class
PostPosted: Wed Apr 18, 2012 16:12 
User avatar
Hibernating Druid

Joined: 27th Mar, 2008
Posts: 49139
Location: Standing on your mother's Porsche
Craster wrote:
I'm the same as Pete. You control the aperture and ISO - do you really care what the shutter speed is doing as long as you're getting high enough for the shot you want to take?

Yes. For bugs anyway.

I still shoot in manual for everything I do. I like pressing buttons and turning dials.

_________________
SD&DG Illustrated! Behance Bleep Bloop

'Not without talent but dragged down by bass turgidity'


Top
 Profile  
 
 Post subject: Re: Nervy-Pete's Photography Class
PostPosted: Wed Apr 18, 2012 16:15 
User avatar
Hibernating Druid

Joined: 27th Mar, 2008
Posts: 49139
Location: Standing on your mother's Porsche
My tripod is fully automatic though.

_________________
SD&DG Illustrated! Behance Bleep Bloop

'Not without talent but dragged down by bass turgidity'


Top
 Profile  
 
 Post subject: Re: Nervy-Pete's Photography Class
PostPosted: Wed Apr 18, 2012 16:42 
User avatar

Joined: 30th Mar, 2008
Posts: 32619
NervousPete wrote:
If you're working on aperture priority, it'll adjust the automatic shutter speed to be slower or faster. If you're working on shutter priority, it'll adjust the aperture, or f/stop. I don't recommend working with auto-ISO though, as it risks impairing quality by introducing noise.
I use auto-ISO, locked to never go above 1600 (typically; I adjust sometimes). Sometimes this makes my Nikon adjust shutter speed to reflect EV settings and other times it adjusts ISO. If you think about it, to reflect a 1/3rd-stop EV adjust, it has to adjust ISO (as it only wants a third of a stop). I've never seen my Nikon adjust shutter speed by anything other than a full stop.

I also shoot almost entirely in Av, except when I'm doing something where shutter speed is a factor (waterfalls, running dogs, etc) which is Sv.


Top
 Profile  
 
 Post subject: Re: Nervy-Pete's Photography Class
PostPosted: Wed Apr 18, 2012 16:56 
User avatar
Hibernating Druid

Joined: 27th Mar, 2008
Posts: 49139
Location: Standing on your mother's Porsche
Doctor Glyndwr wrote:
I also shoot almost entirely in Av, except when I'm doing something where shutter speed is a factor

Fast food?

_________________
SD&DG Illustrated! Behance Bleep Bloop

'Not without talent but dragged down by bass turgidity'


Top
 Profile  
 
 Post subject: Re: Nervy-Pete's Photography Class
PostPosted: Wed Apr 18, 2012 17:22 
User avatar
Ready for action

Joined: 9th Mar, 2009
Posts: 8548
Location: Top Secret Bunker
I usually shoot in manual, choosing the aperture I want for the photo I'm taking and then adjusting the shutter speed for the exposure or the action.


Top
 Profile  
 
 Post subject: Re: Nervy-Pete's Photography Class
PostPosted: Wed Apr 18, 2012 17:28 
User avatar
Excellent Member

Joined: 30th Mar, 2008
Posts: 8019
Location: Cardiff
It's good to shoot manual, don't get me wrong, and its fun. I still shoot manual on occassion. In steady conditions like a studio shoot, house party or macro work it provides a reliable control. But when it comes to landscapes aperture is all you need and fiddling with shutter speeds when you need your eyes continously searching during street photography is a no-no. Shutter speed can be important if you want to deliberately blur or freeze action, in which case manual is the way to go.

DocG, your camera has better ISO noise control than mine, so for you it's not as much a concern. But I do like lots of shadows or underlit moodiness in a fair bit of my stuff, which really brings in noise. Plus from my old days of the D40x noise was a real problem at ISO 800 and over.

The type of camera will also nudge you towards a certain level of control. My D90 has two control wheels, top LCD and every gubbin for full control via buttons no the body. A D5000, D3000 etc although having a better sensor has far less in the way of control features, leading to critical menu hunting on the LCD display. On these models manual is more of a faff, as you have to press down an extra button to select shutter speed / aperture and keep it held down while you twirl the dial.

Anyway, am now working on the aperture entry.

...

Stop right there, Zardoz.

_________________
"Peter you've lost the NEWS!"

Bored? Why not look at some pretty pictures on my photography blog? Here: http://petetakespictures.com

Come & See My Flickery Pics Here: http://www.flickr.com/photos/nervouspete/


Top
 Profile  
 
 Post subject: Re: Nervy-Pete's Photography Class
PostPosted: Wed Apr 18, 2012 18:00 
User avatar
Unpossible!

Joined: 27th Jun, 2008
Posts: 38460
I have also been favouring Av mode. We're all dirty cheaters.


Top
 Profile  
 
 Post subject: Re: Nervy-Pete's Photography Class
PostPosted: Wed Apr 18, 2012 19:42 
User avatar
Hibernating Druid

Joined: 27th Mar, 2008
Posts: 49139
Location: Standing on your mother's Porsche
Mark and I are purists.

I refuse to look at any others submissions, good day.

_________________
SD&DG Illustrated! Behance Bleep Bloop

'Not without talent but dragged down by bass turgidity'


Top
 Profile  
 
 Post subject: Re: Nervy-Pete's Photography Class
PostPosted: Wed Apr 18, 2012 19:49 
User avatar
ugvm'er at heart...

Joined: 4th Mar, 2010
Posts: 22270
Zardoz wrote:
My tripod is fully automatic though.


So i've heard...


Top
 Profile  
 
 Post subject: Re: Nervy-Pete's Photography Class
PostPosted: Wed Apr 18, 2012 21:40 
User avatar
Excellent Member

Joined: 30th Mar, 2008
Posts: 8019
Location: Cardiff
Okay. This is going to be a big one. Pour yourself a whiskey and get comfy. Again, ask away. This is a draft and there may be the odd inaccuracy - such as my grotesquely simplified history of bokeh.

The aperture of a camera lens regulates both the amount of light that enters the camera and the area that will appear sharp in the final image. A device called a diaphragm controls the size of the aperture. It acts rather like the iris of the eye and widens and contracts. This effects what we call 'the depth of field'.

Now, draw a side-on picture of a man sitting a table on a chair, with a vase of flowers atop the table. Draw a little camera facing the man a little distance from the table. Let us say that the camera focuses on the flowers. The area around the subject that is held in focus and appears sharp in the final image is called the depth of field. It is not an even depth. If focused on a given subject, the area of sharpness will be split into thirds - one third in front of the flowers and two thirds behind it. To gain the maximum depth of field of any given aperture when shooting a scene it is therefore advisable to focus one third of the way into the scene.

The aperture diaphragm opens to set diameters each increment of which is known as a 'stop'. These stops are usually assigned 'f-numbers'. The smaller the number the larger the open diameter of the aperture, the higher the number the narrower the aperture. Confusingly the smallest extreme of the f-numbers is called the 'maximum aperture', as it is the maximum size the opening of the aperture can reach.

Conversely the highest f-stop number is known as the 'minimum aperture' due to the smallest size of the aperture opening. The technicalities behind the numbering systems of f-stops is a confusing one. If you really feel the need, read about it here:

http://en.wikipedia.org/wiki/F-number

A fast lens kicks off with a very low f-stop, usually around f/1.4 or f/1.8 for a fixed prime lens or f/2.8 for a pricey fast zoom. A consumer zoom lens usually starts of around f/3.6 to f/5.6 depending on focal length. The lower the number, the wider the aperture, the more light that enters the camera sensor and the more blur you can achieve.

The operation of a camera usually opens and closes the aperture in thirds of an f/stop but the full stops are commonly as follows:

f/1.4 - f/2 - f/2.8 - f/4 - f/5.6 - f/8 - f/11 - f/16 - f/22 - f/32 - f/64

Each increment divides the light by half. This is why an f/1.8 prime lens is so, so much better at indoors and low light photography than a consumer zoom lens, which kicks off usually at f/3.6. Remember the lower the light the slower the shutter speed.

As I said earlier, increasing the f-number increases the depth of field of a sharp image. A landscape would require a higher f-number. Street photography usually demands a good all-round f-stop of f/8 to f/11 which aids in manual focusing and 'grab shots', and aids in placing subjects in context. However, with many lenses a problem arises when an f-number reaches f/16 and higher. This problem is called diffraction and it actually decreases the overall sharpness of the image by a significant amount. The area of sharpness - the depth of field - still increases, but the quality of that sharpness decreases. Annoying, huh? It's a beginner mistake that plagued me a lot as I couldn't understand why I was getting softer images when I was trying to max out the f-stop for what I thought would be sharper landscapes. Only very high quality glass can escape this curse.

A low f-stop number can reduce the depth of field down to a sliver. An f/1.8 shot focused on the eye can leave the tip of the nose blurred. Usually this isn't too big a deal with portraits - indeed it can be pleasing - so long as the eye remains sharp. A blurred eye jolts the brain and ruins the image. So long as the eye is sharp, all is gravy. Here's another confusing variance - the depth of field also varies according to the focal length of the lens you're using. What's a focal length? It's the number in mm's that your lens is at. For example 24mm, 35mm or 50mm. Now, the lower the focal length, the wider the depth of field will be for every f-stop. This is why a 24mm lens or lower is so good for scenery. Not only does the focal length allow for a wider field of vision, but it also allows for a greater depth of field before diffraction sets in. A higher focal length can reduce the depth of field for even a relatively high f-number such as f/8 down to a few feet, given a telescopic enough lens. I shall explain about focal lengths more on a future post and how they can be manipulated for drastically different styles of shot.

In general, lower f-stops tend to be slightly less sharp than higher f-stops until that dreaded diffraction sets in. The difference isn't always that apparent though and quality glass is scarcely affected. There's something people call a 'sweet spot' for lenses, which is the f-stop that the lens displays the maximum tack-sharp quality. It varies, but a good rule of thumb is two stops lower than the widest aperture.

On some lenses you'll find that certain apertures also induce unpleasant blue and purple fringes to high contrast areas. This is less and less a problem, due to the general increasing quality of lenses and auto-correctional sensor firmware and post-processing packages.

But at the opposite end of trying to achieve the widest tack-sharpness is a little thing you may have heard of - bokeh.

Oddly, bokeh was an alien concept until the late nineties. It used to be that all photographers obsessed about was how sharp they could get their lenses. By the eighties modestly priced quality lenses had achieved a sharpness hitherto undreamed of. Photographers were besides themsleves with the glory of a pin-focused world. Sharp sharp sharp. Sharpy sharp. Hey! I can get the whole scene in, dead-sharp like!

But by the early nineties a mounting feeling of alarm began to manifest itself. Photographers realised that all their pictures were beginning to look the same. Enter Mike Johnston, editor of Photo Techniques. Johnston argued an entirely novel concept over three papers in the March / April 1997 issue. He argued that a higher quality of blur was as equally desirable as sharpness and that photographers should start thinking about what couldn't be seen as much as what could - in effect, seeking the most pleasing way of isolating a subject. Lens manufactures leapt on it. Bokeh (originally in Japanese called boke-aji) relates not just to those pleasing little circles and hexagons of out of focus specular lights, but the general quality and smoothness of blur in an image. It also refers to senility. But hey.

Following this bokeh became all the rage - especially in portraits. People also found that bokeh was easiest to achieve in telephoto lenses of a long focal range - at least 50mm and above, the best beginning around 75mm to 85mm. By the same token, bokeh was very hard to achieve in wide angle lenses - which is why the bokeh-fantastic Nikon 24mm f/1.4 lens costs around £1,500.

The best bokeh doesn't necessarily occur at the widest aperture, but it's usually pretty close to it. Why not experiment and see what you can get?

Phew. Got all that? Honestly, that's the hardest technical bit of photography right there - until you start messing around with flashguns that is. It's easier from here on in. Really. So what kind of aperture should you be looking at for your shots?

There are no hard and fast rules, but here's some ideas:

Portraits.

To maximise bokeh you should shoot a wider aperture and go for a longer focal length of 50mm and over. Long focal lengths also bestow a more natural, less distorted and more pleasing shape to the human face. For this make sure you keep your portrait subject a good distance from any objects behind them. The further away objects are from a narrow depth of field, the smoother and creamier the blur. Also make sure nothing's blurred in the foreground - the eye rejoices at a blurred background element and revolts at a blurred foreground. (This doesn't so much apply to grass, dirt etc.)

Sometimes you might want to go for an environmental portrait. For example shooting dear old Grandad in his favourite place, the potting shed. In this case a sharp environment trumps bokeh time.

Landscapes.

F/9 to f/22 depending on how good your lens is. The better placed your point of focus the lower the number you can get away with here. Remember - one third of the way into the scene is the best! To really max out depth of field look up hyperfocal distances, but I won't explain that here as your brains would in all likelihood explode. As mine threatens to do when I try to work it out. With is awesome large format camera and lens, Ansel Adams went for f/64 for super non-diffracted sharpness. Sometimes, he even went as high as f/128 and f/256. Wowsers!

Street-photography.

Cartier-Bresson said, "F/11 and be there." He's not to be argued with.

Macro-photography.

Rules alter dramatically here. The closer you focus to a scene, the narrower the depth of field. You'd think an ickle fly would only require a wide aperture, due to how wee it is. Ha! Not so! That image is still as big as a landscape when you look at it, and you want all of that landscapey-anty-body in focus with all its hairs and agonized Jeff Goldblum face. Very narrow apertures apply here, which is why macro photographers need tripods usually. This counts for flowers, computer chips and Zardoz's toys.

Dogs.

Dogs have long snouts. Noses are as important as eyes in their case. A narrower aperture required.

And that about wraps it up for aperture! Sorry I went on for so long there but I wanted to be thorough. You can hopefully see now why I prioritise aperture over shutter speed. Next up I'll be talking about a medley of smaller technical concepts such as ISO, manual and automatic focus and white balance, before moving onto the far more interesting creative side.

_________________
"Peter you've lost the NEWS!"

Bored? Why not look at some pretty pictures on my photography blog? Here: http://petetakespictures.com

Come & See My Flickery Pics Here: http://www.flickr.com/photos/nervouspete/


Top
 Profile  
 
 Post subject: Re: Nervy-Pete's Photography Class
PostPosted: Thu Apr 19, 2012 10:47 
User avatar
Level 6 Laser Lotus

Joined: 26th Aug, 2010
Posts: 2069
Blimey Pete! I think i need to re-read both of your awesome posts whilst fondling my camera, i hope more of it will sink in then, thanks for going to all this trouble.

_________________
Shin: a device for finding furniture in the dark

If at first, the idea is not absurd, then there is no hope for it


Top
 Profile  
 
 Post subject: Re: Nervy-Pete's Photography Class
PostPosted: Sat Apr 21, 2012 14:08 
User avatar
Excellent Member

Joined: 30th Mar, 2008
Posts: 8019
Location: Cardiff
White Balance, ISO, Focusing and Technical Bits & Bobs

It’ll be good to get this brief final technical hurdle out of the way before we begin on the creative side of photography. First of all we shall look at focusing. We have already discussed shutter speed being critical in achieving a sharp picture, but there are other points to consider too...

Focusing

Looking through your viewfinder you should see little bracketed squares or circles. These are auto-focus control points. One of the main differences between beginner DSLRs and point-and shoots from the more advanced models are the number of AF control points and their ease of use. You should most likely have at least three in your viewer. These can usually be controlled with the cursor pad or a control wheel-button combination.

The first thing you learn to do is to half-depress the shutter to focus and then reframe accordingly. It’s common to begin by by favouring the centre focal point for this. But there’s a hidden cost to this. In situations of narrow depth of field you can actually swing your chosen point out of focus, as the angle of shooting can make a difference. It is better by far to think ahead to what focus point you’ll be wanting to use, adjusting and then shooting. It will also save you time when photographing moving objects and make you less visible in street photography.

Manual focus is a important tool both in terms of accuracy and creativity, but can be a hindrance in time critical photography. You will find though that working manually – if you have good eyes – will net you a better focus in low light conditions than autofocus. Sometimes you want that space to be blurred as well. Manual photography comes into its own with street photography. Fix your aperture to around f/8 – f/11. Focus on a wall and adjust your distance until you’re happy with a comfortable working distance and the amount of depth you have. Fix the distance your mind, maybe counting the steps up to it. Now, switch to manual. Now you can advance roughly into the right spot and shoot away without having to focus. This proves very useful in getting ‘stolen’ shots while ‘shooting from the hip’.

White Balance

Next up we have white balance. With today’s photo packages such as Photoshop, Apeture and Lightroom offering effective automatic and manual adjustments to white balance it’s less important as it once was to get it right in camera. However, there are yet again reasons to take a little extra time. Firstly, the histogram reading is actually affected a little by white balance and you will get a more accurate idea as to exposure this way. Secondly, if you’re shooting JPEG it is far, far harder to reset white balance than if you are shooting RAW – nigh impossible, in fact. Thirdly, you get a better idea of colour with an accurate white balance and it will aid in the composition. It has also to be said that deliberately mangling white balance is a good creative tool.

The most accurate way of getting the correct white balance is by taking a reading from a neutral-grey card under the same lighting conditions. Personally I don’t often fuss with this, though.

ISO

Finally we have ISO speed. ISO greatly increases your camera’s ability to capture light. There are problems however. As you rack up the ISO you will also gain added noise, both in luminance and chromatic. Luminance is usually the first to appear and is easier to shift, indeed it can add a pleasing grain in black and white. Chromatic is uglier, more random and harder to remove. Today’s photo packages have pretty good noise removal software, but you’ll find that if you have to use it more than a touch it will start to remove detail from your shots. As earlier stated in the exposure section noise introduces far more readily in underexposed shots than in correctly exposed ones. Another problem with high ISO’s are that the tonal gradations and colours are less natural and smooth and the dynamic range is increasingly limited resulting in more clipping – especially with over-exposed elements. This is why I dislike using auto-ISO and find myself being conservative with its use.

Other little details that can help you…

Exposure bracketing.

This takes two shots or more either side of your exposure to provide safe alternatives. On no account should it be used to create HDR shots, which are the art-form of Beelzebub himself.

Metering Modes.

These usually come in three flavours, Matrix, Centre Weighted and Spot. Matrix is ideal of complex scenes, landscapes and street photography. You can focus anywhere and it’ll give a decent option.

Centre weighted is best in group shots and portraits to nail that skin tone. Simply focus on a face and readjust.

Spot metering is for precision work and is best with portraits where the background is significantly darker or brighter than the main subject. It also aids in creative photography when you want to force the camera to meter off a specific tone.

Setting your camera’s world time results in useful metadata for travel blogs and the like later. New cameras often have GPS as well which is fun for Flickr tagging and the like. A very important tool also is a button for protecting certain shots on the memory card from accidental deletion. On my D90 this button has the picture of a key on it, but yours may vary.

And that’s the technical side done with. I’ve probably forgotten something but, tch – never mind. Next up we’ll be looking at that most important of blessings… light.

_________________
"Peter you've lost the NEWS!"

Bored? Why not look at some pretty pictures on my photography blog? Here: http://petetakespictures.com

Come & See My Flickery Pics Here: http://www.flickr.com/photos/nervouspete/


Top
 Profile  
 
 Post subject: Re: Nervy-Pete's Photography Class
PostPosted: Sat Apr 21, 2012 14:26 
SupaMod
User avatar
Commander-in-Cheese

Joined: 30th Mar, 2008
Posts: 49232
Excellent info, Pete. One thing I'll add to that (which may be better covered under postprocessing, but still) is in reference to this bit:

Quote:
Today’s photo packages have pretty good noise removal software, but you’ll find that if you have to use it more than a touch it will start to remove detail from your shots


For artistic reasons I actually like to overdo the noise reduction in landscape photography. This is specifically because I'm looking to capture a pleasing scene, rather than a picture where the minutest detail is captured. You end up with the detail looking almost a little like a watercolour, which I find pleasant. An example:

Attachment:
pic1.PNG


Note how the colours look almost smeared? That's zoomed right in, so it's a fair bit more subtle on the full picture:

Attachment:
pic2.PNG


Anyway, that was an aside really just to note that sometimes things which seem bad (removing of detail, as my example) sometimes can be something you might deliberately want - and the same applies to maybe deliberately overexposing an image, or washing out colours.


You do not have the required permissions to view the files attached to this post.

_________________
GoddessJasmine wrote:
Drunk, pulled Craster's pork, waiting for brdyime story,reading nuts. Xz


Top
 Profile  
 
 Post subject: Re: Nervy-Pete's Photography Class
PostPosted: Sat Apr 21, 2012 14:31 
User avatar
Skillmeister

Joined: 27th Mar, 2008
Posts: 27023
Location: Felelagedge Wedgebarge, The River Tib
Can we get this added to the Threads of Note and Worth, because it's probably the best thing that's ever appeared in this pit.

_________________
Washing Machine: Fine. Kettle: Needs De-scaling. Shower: Brand new. Boiler: Fine.
Archimedes Hotdog Rhubarb Niner Zero Niner.


Top
 Profile  
 
 Post subject: Re: Nervy-Pete's Photography Class
PostPosted: Sat Apr 21, 2012 14:33 
SupaMod
User avatar
Commander-in-Cheese

Joined: 30th Mar, 2008
Posts: 49232
Absolutely.

_________________
GoddessJasmine wrote:
Drunk, pulled Craster's pork, waiting for brdyime story,reading nuts. Xz


Top
 Profile  
 
 Post subject: Re: Nervy-Pete's Photography Class
PostPosted: Mon Apr 23, 2012 15:00 
User avatar
Excellent Member

Joined: 30th Mar, 2008
Posts: 8019
Location: Cardiff
Lessons in Light

Now with ego-boosting example photos!

What is the most important accessory your camera can have? The answer is light – and the good news is that it’s free. Make no mistake, a photograph taken on an iPhone in gorgeous light will trump a photograph taken by a professional high-spec camera in ugly light. When you see amazingly beautiful photographs the question shouldn’t be, “What camera and lens did he use to grab that?” but “Where did he get that light!?”

The great thing about light is that it can be very generous. It can add depth immersing you in a two dimensional image. It can highlight moments and objects you wish to draw attention to, and impart greater significance upon them. It can wash away blemishes and expose ugly truths. And it can trigger an emotional response – be it aching nostalgia or a cold shudder. At the most basic light and shadow reveals and conceals. But to use it effectively you need patience. Sometimes you have to wait a fair while to get the best light, or awake at an uncomfortably early hour.

Here I am going to describe the different types of light that can be found and the best use to make of them. Again, think of these as handy tips that can be ignored by your own instinct or judgement – there are no hard and fast rules, and sometimes there’s no such thing as ‘bad light’, only the bad use of light.

We’ll start with that most magical of light – the thirty to forty minutes before and after sunset and sunrise known variously as ‘the golden hour’ or ‘the magic hour’. What look does this give you? Watch a Michael Bay film. Pretty much every daylight shot is filmed in the magic hour – or given heavy digital manipulation to make it look like it was. A better choice of film for varying forms of gorgeous light is Terrence Malick’s ‘Tree of Life’ and ‘Badlands’. Emmanuel Lubezki and Tak Fujimoto show an immense understanding of the possibilities of light – so much so that any shot you take from those films could serve as a superb photograph in its own right.

So how does this ‘magic hour’ work? Well, as the sun sits low on the horizon the rays it emits has to pass through a thicker depth of atmosphere. The increased density of the air scatters the blue wavelength of the spectrum, leaving the reds dominant. This leads to a richer, more golden light. The atmosphere also diffuses the light more, making the shadows soft, whilst the low angle creates long raking shadows. This is perfect for portraits, landscapes and general walk-around shots. However, it doesn’t benefit flower or flora photography as much as you’d think.

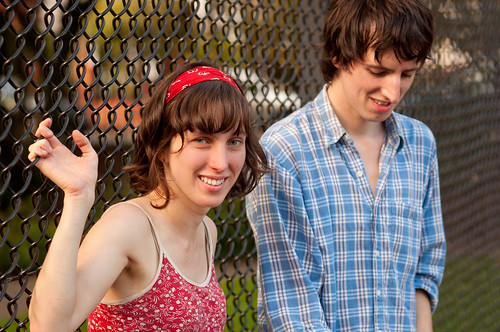
Here’s an example of the magic hour at work in a portrait of two friends of mine. Note the soft light giving a healthy glow to the face, the shadows commonly found around the eyes and along the nose and washed out and the colours are richer yet softer without the hardness of a noonday shot.

Image

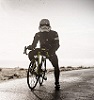
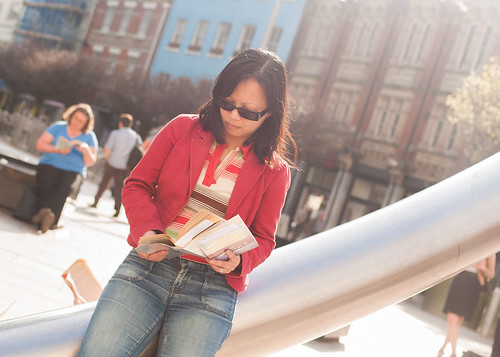
Naturally greater results can be achieved by shooting in the correct direction. With a low sun flaring on the lens becomes more of an issue. Backlit subjects can be difficult to expose correctly without fill-in flash. However, by very carefully shooting into the sun at a certain angle an interesting result can be obtained. This adds a more ethereal glow and lowers contrast throughout the image while increasing the highlights. This is called ‘contra’ shooting and is quite tricky to do, but rewarding. Depending on the angle the effect can vary in power, but here’s a modest example:

Image

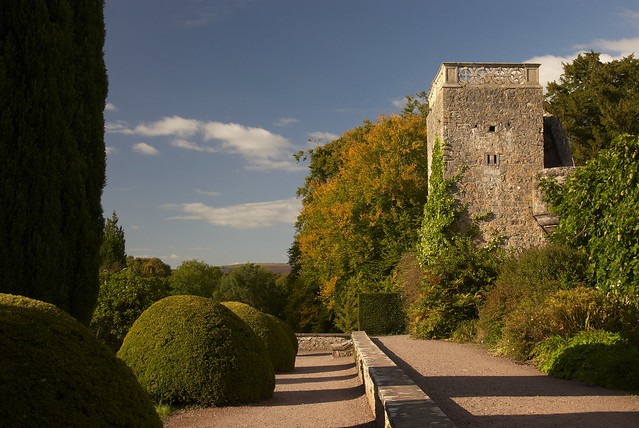
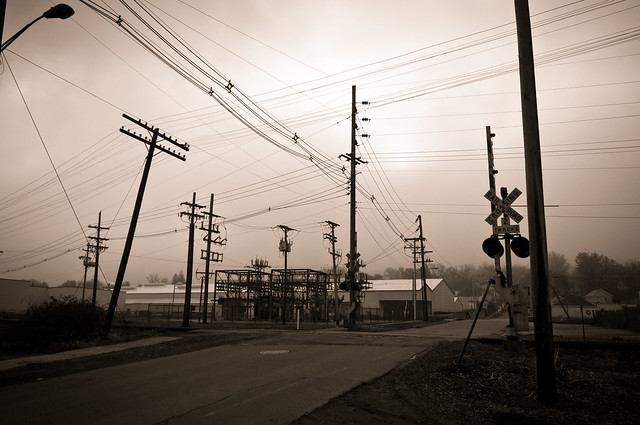
As I mentioned earlier, it is the raking light that lengthens shadows that is a key asset in magic hour. To make the most of it you have to train yourself to imagine what certain features will look like at certain times of the day. For example, if you walk past a fence and a tree it may look perfectly dull and commonplace in the daytime, but at sunrise or sunset the shadows it casts can frame subjects – be they people or objects. Sometimes it is useful to take a photograph in bad light to remind yourself to return later for a better opportunity - a visual notepad if you will.

This recessed drive-through ticketing window would look quite dull in round noon or in cloudy weather, but here with the golden, raking light it acquires depth and colour – the reds providing a warm glow to sink into while the eye fixes upon the green glass of the window. Note how the illuminated patch of wall creates a sort of arrow that leads the eye from left to right towards the point of interest. Visually Western cultures read left to right and the use of light stregthens that draw.

Image

It is a happy fact that the long raking shadows aren’t cast by the facial features of portraits shot at this hour. The nigh-perfection of magic hour light can seem like a divine blessing.

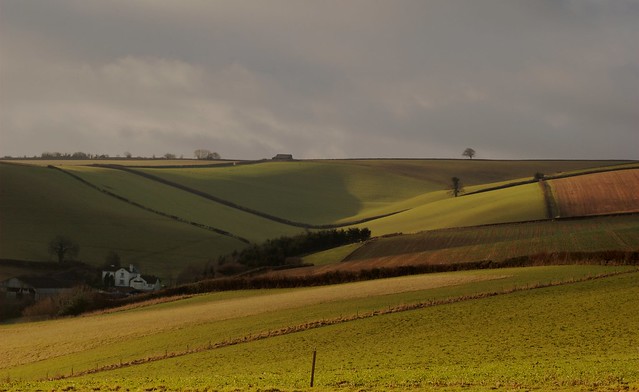
Using this light does require patience and planning which leads me into the importance of patience in landscape photography. To get the best shots you must arrive early, which will usually be when the light is still bad – and sometimes the weather too. It’s no use looking out the window and noticing lush light and then deciding to hike up that hill to make use of it. By the time you get there it will invariably be gone. Instead, go out early and park yourself on the hillside. Set your camera ready to go now, don’t leave it to the decisive moment to fiddle with aperture and such. Even an overcast day can have breaks in the cloud, which can lead to magical moments.

Image

This image when reviewed on the LCD was only mildly impressive, but when working with Lightroom later on tweaking the contrast levels and a bit of burning and dodging brought the shafts of light out against the landscape.

Without ascending up Smith Rock in Oregon in thick mist I would never have been in the right place at the right time when the clouds broke and presented me with my two favourite shots of mist rolling into – and out of – a river canyon in a vast amphitheatre of softly glowing rock formations.

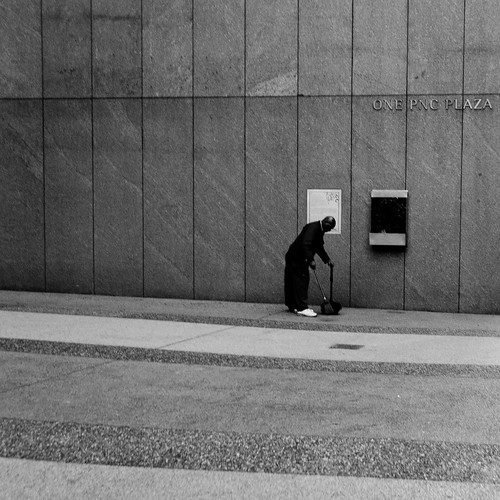
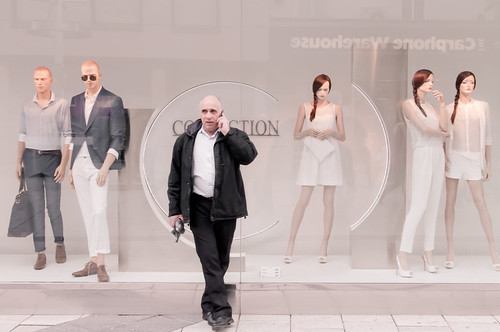
So we can take it that magic hour is a good thing. But what happens when you are robbed of shadow and the light is flat and hard. Well the brutal truth is that it makes interesting photography a lot harder, but it can still be done with luck. In these cases you have to go for broke on composition and interesting subject matter. The light in this image of a man sweeping up is incredibly boring and ugly. And yet it works for this image. Lacking a shadow the man is reduced of substance. The ugly concrete of the corporate building is hard and flat unrelieved by shadows or texture. It dominates the frame without relief. The square framing imposes a hard, emotionless classical feel that of a subject that is literally neither portrait or landscape. We are left with the sight of a man toiling like a worker ant, shrunken within an uncaring featureless environment. It’s one of my favourites and the light couldn’t have been worse for beauty, but better for complimenting the shot.

Image

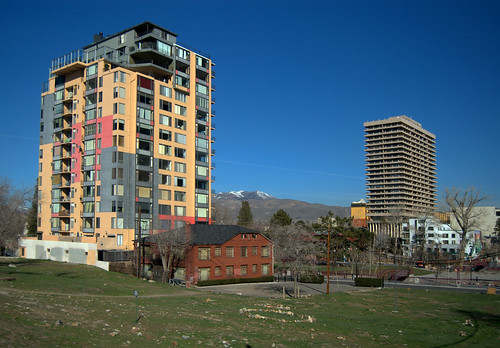
Hard light can destroy a photograph. Here’s an example of one I took in Reno of two colourful apartment buildings. Note the harsh over-brightness, the hard contrast and the lack of any shadows and the far too amped colours. It is in effect a tedious shot.

Image

Sadly this is what you usually get when mad dogs and Englishmen shoot in the noonday sun. The lack of shadows destroys leading lines and makes anything but the simplest composition a meaningless clutter. On the portrait skin glistens unattractively, hair acquires a hard shine and contrast imposes deep shadows in the eyesockets. Furthermore, the intensity of the sun is such that everybody squints against the light bouncing off concrete or beating down from above. The best occassion to shoot in midday is – ironically – when the skies are clouded over. This diffuses the light. What effect does this have? Well, it makes the light softer. You still lack the shadows, but this is actually of great benefit for flower and macro photography where you’re concentrating on the shape and form and colour of the subject and where you don’t want petals casting shadows on the inner depths of the flower or the image of the bumblebee confused by a muddle of twig shadows cast over it.

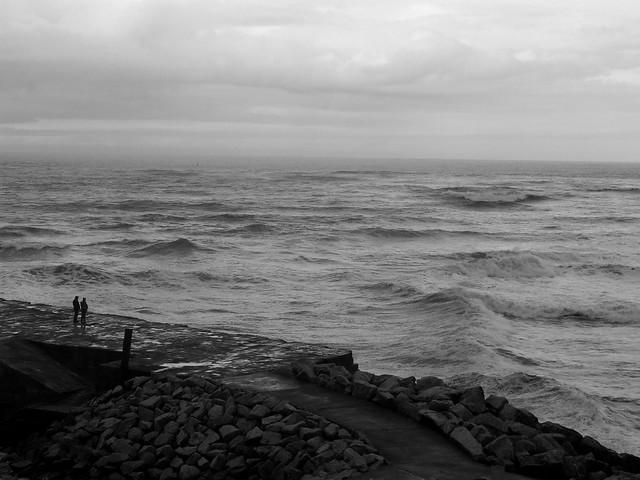
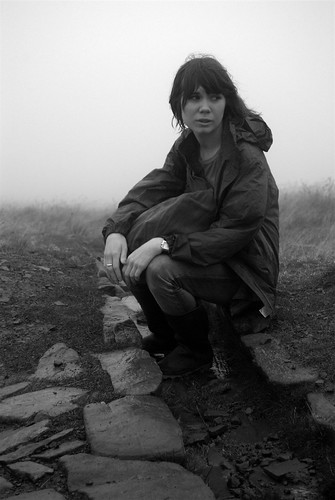
Here’s an example of diffuse light in the form of a thick mist isolating a subject and providing an even but gloomy light that accentuates a kitchen sink feel. Black and white works very well with diffuse light and can be used to create quite an evocative feel.

Image

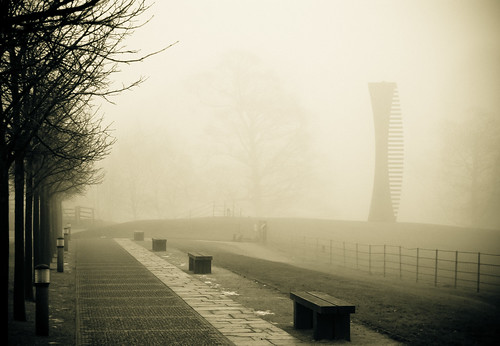
Mist and fog are naturally feted by photographers for their ability to isolate a subject. They also provide a chillier, more dream-like tone. In bright sunshine this shot taken in Breton Sculpture Park in Yorkshire would be a meaningless, pleasant landscape but with mist and shadowless light it acquires threatening and mysterious overtones.

Image

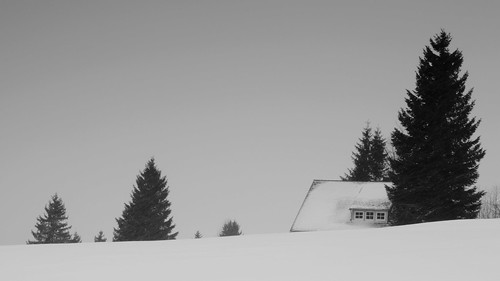
In overcast conditions bereft of shadow shape becomes more important and photographs can become pleasingly simple in form. This simplicity is not usually reflected in nature and the human eye enjoys a simple, abstract view with few elements. In photography less is usually more. In this photograph I took in Germany the scene is filled with a flat light and the only elements are the snow, the trees and the house. This immediately conjures story. Who lives in the house? Are we ploughing through the snow to get there? It can be imbued with a fairy-tale atmosphere.
Image


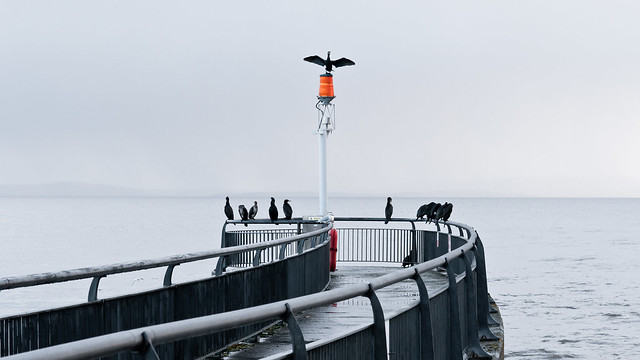
When it comes to the bulk of the day light is quite forgiving but not especially interesting of itself. It’s then that you think more about colour and composition. By no means write-off morning and afternoons, light is a good all-rounder and can still be pleasing. Subtle colour tints can be applied either way later in post-processing if you want to accentuate the image with a particular feel. Here’s an example of a opportunity from an aimless walk-around in the American town of Prineville.

Image

Night time. A key feature of night is the lack of light. This occurs because we cannot see the sun. In essence, the sun rays are blocked from us, leading to a lack a light. It is light which we require to see and which we need so that things can be seen. Night.

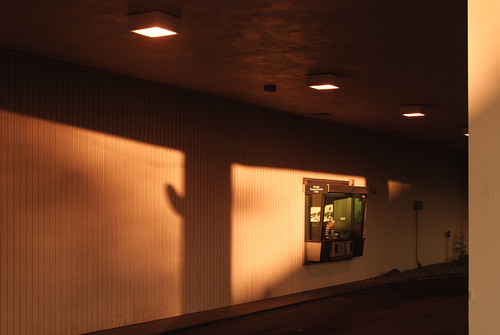
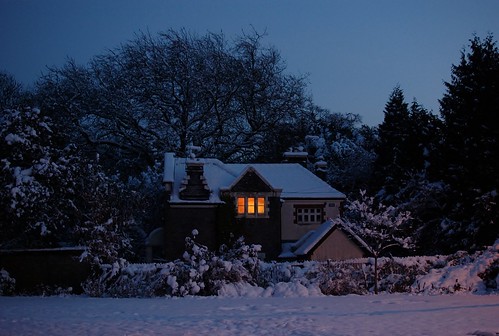
Fortunate then that night does have sources of light independent of the sun. Here an interior light shines all alone in the night.

Image

Here’s an odd thing though. Most quality night-time shoots occur in twilight while there is still that blue cast in the sky or in strong yet diffuse moonlight. In true night time conditions contrast increases dramatically, with independent light sources having very little transition between light and shadow. Witness Abraham Simpson walking away from camera through the pools of light cast by streetlamps. This can be evocative but it also plays merry hell with the camera sensor. Exposing for shadow means that light sources are burnt out or look harsh and clipped. Therefore it is better to shoot in twilight when there is still a little ambient light to play with. Another reason is that the light polution in cities casts a sometimes unwelcome sodium glare – especially when reflected off clouds. This is somewhat lessened in twilight and you can always take the image and darken the sky in post-processing if you wish for a true inky feel.

Again, night simplifies by concealing and it is simplicity that draws one in night-shots. Subjects are illuminated and there are few distractions.

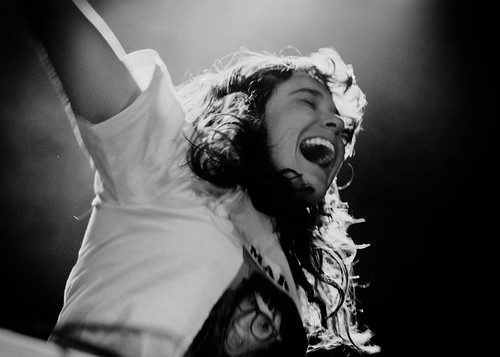
Another tricky but rewarding feature is when subjects are backlit in low light conditions. This is hard to achieve naturally but can occur on such occassions as music gigs, urban nighttime street photography or dedicated portrait photoshoots. Here’s an image of DJ Jen Long. Note the hair illuminated from behind creates a pleasing halo. The lowlight forced a slower shutter speed and higher ISO, leading to grain. In this case it complements the scene.

Image

It isn’t just the quality and amount of light that has an impact upon a scene but the elements of contrast and transition. Two terms that cover this are ‘high-key’ and ‘low-key’ lighting.

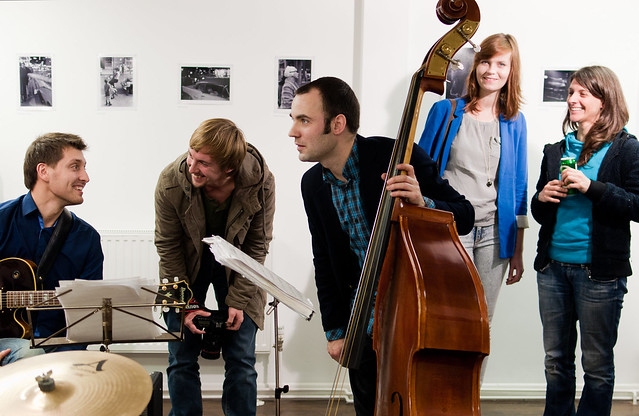
High key lighting is a term given to a low ration of contrasts in light. It’s usually found in portrait photography and is usually an even, flattering light. It’s also beloved of early Hollywood where technical limitations meant in lighting meant that in lighting compositions had to be uncluttered – or that cluttered compositions had to be looked upon with a simple, even light. Usually time and money meant the former. Here it is found in a street photography photograph. Note the flat brightness isolating the main subject.

Image

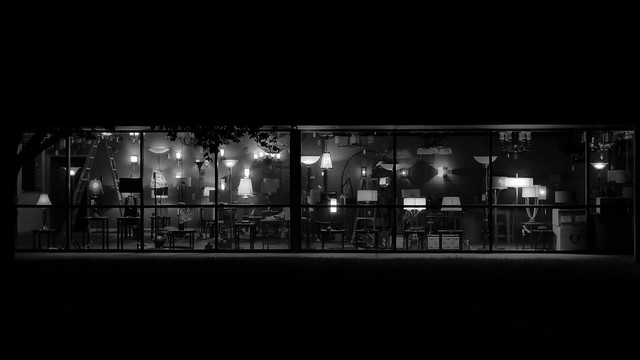
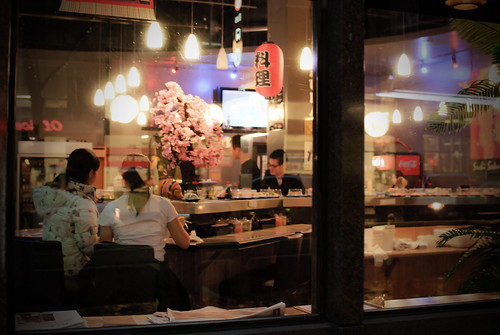
Low key lighting is somewhat more interesting. It consists of many transitions between light and dark, with a high contrast ratio. This can be used to illuminate elements you wish to draw the eye to while using dark elements to frame. In this photograph the dark shadows of the window frame box out the warm interior within the restaurant, while the bright lights draw the eye in and leave them with the faces of the people.

Image

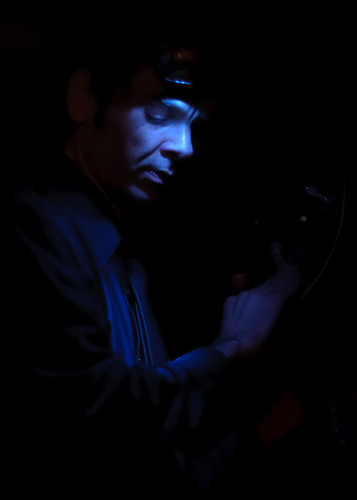
It also proves very evocative in portraits taken with limited, directional light – such as people lit by candle or window light. This was a staple of Vermeer and his school, where the boundaries of light and dark gave three-dimensional form to bodies and faces. With the higher contrasts it is called ‘chiaroscuro’ light. It leads to heightened drama and mystery. It usualy isn’t used in baby portraits. Here are two examples – a heavily Vermeer inspired portrait by window light and a more grungy and moody version with Thomas Truax, lit in very low light by nightclub spotlights.

Image

Image

These then are the main forms of light. How you harness them is up to you. It is worthwhile however stopping to think of the sort of emotional impression you wish to give in a photograph and working out the best light for it. The complexity of light can hinder or benefit composition – just as composition can benefit or hinder the emotional response to forms of light. Again, these are guides rather than rules and mistakes in photography are many times more interesting than the products of rigid thinking. A glib rule oft used is to avoid shadows in portraits, yet as we can see above in low-key photography it can prove very evocative.

Next we shall be looking at composition and how it shall one day destroy your knees.

_________________
"Peter you've lost the NEWS!"

Bored? Why not look at some pretty pictures on my photography blog? Here: http://petetakespictures.com

Come & See My Flickery Pics Here: http://www.flickr.com/photos/nervouspete/


Top
 Profile  
 
 Post subject: Re: Nervy-Pete's Photography Class
PostPosted: Mon Apr 23, 2012 15:06 
SupaMod
User avatar
Commander-in-Cheese

Joined: 30th Mar, 2008
Posts: 49232
Amazing stuff, Pete.

Quote:
Next we shall be looking at composition and how it shall one day destroy your knees.


Heh. Yes.

_________________
GoddessJasmine wrote:
Drunk, pulled Craster's pork, waiting for brdyime story,reading nuts. Xz


Top
 Profile  
 
 Post subject: Re: Nervy-Pete's Photography Class
PostPosted: Mon Apr 23, 2012 15:17 
User avatar
Hibernating Druid

Joined: 27th Mar, 2008
Posts: 49139
Location: Standing on your mother's Porsche
Pete, this resource is crying out to be published.

_________________
SD&DG Illustrated! Behance Bleep Bloop

'Not without talent but dragged down by bass turgidity'


Top
 Profile  
 
 Post subject: Re: Nervy-Pete's Photography Class
PostPosted: Mon Apr 23, 2012 15:56 
User avatar
Excellent Member

Joined: 30th Mar, 2008
Posts: 8019
Location: Cardiff
And it will, in a sense. I'm currently quietly working on articles for a photography website I'm going to put up. It's going to be focused on photographers and technique and my own learning experience (thus craftily showcasing my stuff) rather than gear. This is primarily because I'm too poor to afford said gear. Soon as I have a stable of articles to put up and kick off with and as soon as I've figured out how to best design a website I'll get it set up, which should be this summer - hopefully. No, really.

You Beexers are my test audience. Glad you're liking.

_________________
"Peter you've lost the NEWS!"

Bored? Why not look at some pretty pictures on my photography blog? Here: http://petetakespictures.com

Come & See My Flickery Pics Here: http://www.flickr.com/photos/nervouspete/


Top
 Profile  
 
 Post subject: Re: Nervy-Pete's Photography Class
PostPosted: Mon Apr 23, 2012 16:03 
SupaMod
User avatar
Commander-in-Cheese

Joined: 30th Mar, 2008
Posts: 49232
Just so you know, by putting it up here first you're granting the mods copyright and 70% of all future moneez you may make out of this venture. And any other venture you do ever.

_________________
GoddessJasmine wrote:
Drunk, pulled Craster's pork, waiting for brdyime story,reading nuts. Xz


Top
 Profile  
 
 Post subject: Re: Nervy-Pete's Photography Class
PostPosted: Mon Apr 23, 2012 16:04 
SupaMod
User avatar
Est. 1978

Joined: 27th Mar, 2008
Posts: 69509
Location: Your Mum
Craster wrote:
Just so you know, by putting it up here first you're granting the mods copyright and 70% of all future moneez you may make out of this venture. And any other venture you do ever.

Mods schmods. All of this shit up in here is my IP now, bitches.

_________________
Grim... wrote:
I wish Craster had left some girls for the rest of us.


Top
 Profile  
 
 Post subject: Re: Nervy-Pete's Photography Class
PostPosted: Mon Apr 23, 2012 16:05 
User avatar
Excellent Member

Joined: 30th Mar, 2008
Posts: 8019
Location: Cardiff
Grim... wrote:
Craster wrote:
Just so you know, by putting it up here first you're granting the mods copyright and 70% of all future moneez you may make out of this venture. And any other venture you do ever.

Mods schmods. All of this shit up in here is my IP now, bitches.


*Starts deliberate misinformation to make Grim... look stupid*

_________________
"Peter you've lost the NEWS!"

Bored? Why not look at some pretty pictures on my photography blog? Here: http://petetakespictures.com

Come & See My Flickery Pics Here: http://www.flickr.com/photos/nervouspete/


Top
 Profile  
 
 Post subject: Re: Nervy-Pete's Photography Class
PostPosted: Mon Apr 23, 2012 16:12 
8-Bit Champion
User avatar
Two heads are better than one

Joined: 16th Apr, 2008
Posts: 14489
NervousPete wrote:
Grim... wrote:
Craster wrote:
Just so you know, by putting it up here first you're granting the mods copyright and 70% of all future moneez you may make out of this venture. And any other venture you do ever.

Mods schmods. All of this shit up in here is my IP now, bitches.


*Starts deliberate misinformation to make Grim... look stupid*


/me just quotes any of Grim...'s recent posts

viewtopic.php?f=3&t=8530&p=659534#p659534

Image


Top
 Profile  
 
 Post subject: Re: Nervy-Pete's Photography Class
PostPosted: Mon Apr 23, 2012 16:14 
SupaMod
User avatar
Est. 1978

Joined: 27th Mar, 2008
Posts: 69509
Location: Your Mum
NervousPete wrote:
*Starts deliberate misinformation to make Grim... look stupid*

I'm not convinced that'll make much difference when I do a HIGH COURT SMACKDOWN on your website. Or something.

_________________
Grim... wrote:
I wish Craster had left some girls for the rest of us.


Top
 Profile  
 
 Post subject: Re: Nervy-Pete's Photography Class
PostPosted: Mon Apr 23, 2012 16:15 
SupaMod
User avatar
Est. 1978

Joined: 27th Mar, 2008
Posts: 69509
Location: Your Mum
zaphod79 wrote:
/me just quotes any of Grim...'s recent posts

viewtopic.php?f=3&t=8530&p=659534#p659534

Image

I'm clearly the only one there that doesn't look stupid.

_________________
Grim... wrote:
I wish Craster had left some girls for the rest of us.


Top
 Profile  
 
 Post subject: Re: Nervy-Pete's Photography Class
PostPosted: Mon Apr 23, 2012 17:15 
User avatar

Joined: 30th Mar, 2008
Posts: 16559
That thing on your back looks like Zardoz. You look like you're being bummed by Zardoz.


Top
 Profile  
 
 Post subject: Re: Nervy-Pete's Photography Class
PostPosted: Mon Apr 23, 2012 17:25 
SupaMod
User avatar
Est. 1978

Joined: 27th Mar, 2008
Posts: 69509
Location: Your Mum
A drunk bloke walking by grabbed Mitch and snogged her with massive amounts of tongue, to the "hur hur hur"s of his group of friends. I informed him that I'd "had my cock in there". Pwned.

_________________
Grim... wrote:
I wish Craster had left some girls for the rest of us.


Top
 Profile  
 
 Post subject: Re: Nervy-Pete's Photography Class
PostPosted: Sat May 12, 2012 14:00 
User avatar
Excellent Member

Joined: 30th Mar, 2008
Posts: 8019
Location: Cardiff
Composition


It’s hard to say why the human mind sees certain confluences of lines and shapes as pleasing and more cluttered arrangements as distracting. I am the kind of person who will square a ruler to the spine of a book to the edge of a study-desk, albeit only when I’m intolerably bored. This alignment of elements is part and parcel of both urban and landscape, but how you arrange colours, emotions and even ideas within the frame are part of it too.

The acknowledged master of composition is Henri Cartier Bresson and I strongly recommend you study one of his books to see how he uses composition. In this lesson I’ll be offering up some of my own inferior examples alongside explanations as to why I shot them the way I did. First of all we’ll begin with the large scale elements found in landscapes…

The most basic of compositional guidelines is the rule of thirds. Imagine the three by three of a noughts-and-crosses and grid. With a landscape if the sky holds the most interest it is to be favoured by filling the viewfinder with the top two thirds. Likewise, if the ground itself is more interesting it should dominate the lower two thirds. This can be stretched to involve any element. A spooky forest could dominate the centre and right of a photograph with an empty field on the left for example.

Sometimes you’ll want to kick against this rule to imply movement and dynamism. For example a pitch invasion of a football field could show the surging crowd only in the left third and the empty space with scattered footballers in the centre and on the right – allowing the eye to draw the crowd in and giving room for the imagination to picture the flow, to give an imagined dimension of time to the image.

A more abstract or classical form can benefit from an exact division of lines. Many effective landscapes have been recorded with the horizon dead centre, for example the crystal clear reflection of a line of trees beneath a blue sky over an azure lake. Basically as with so much photography; if it feels good, go with it. Let’s take a look at some examples:

Image

This dull sky isn’t much of a draw but these softly lit fields are.

You can play with this further to a more emotional effect, even with landscapes as you can see below.

Image

The above stormy seascape combines three elements – land, earth and water. The water is favoured as the violently churning waters are the most emotionally charged element in the shot. Note how the rocky walk at the bottom only properly fills two thirds of its own lower strip – this forces the two little figures onto the edge of the photograph and makes them seem all the more vulnerable – dwarfed by the cold indifferent sky and the angry waves, with only a little strip of rock to hold them.


Rules can be broken as below – this night shot of a store selling lamps benefits from a more abstract mood, with the underexposed foreground sandwiching the illuminated strip under an equally dark sky. A lonely, isolated feel is the result.

Image

So we now know where to place general sweeps of form. When it comes to smaller, individual elements such as people, items of furniture, lampposts and trees we can once again turn to the nine square grid for guidance. Each intersection – nine points in all – of the grid can be used to place a ‘point of interest.’ For example, say you have a blue sky and a green field. You might want to place the more interesting field in the bottom two thirds. But say you have a person in that field, then where to place them? Well, think in thirds again and place them in the left of the shot. Say you want an unconventional portrait with a bird soaring overhead? Then position the sky to give it two thirds of the shot with the bird in the top right intersecting point, and place the upward glancing head of the subject in the lowest left. The eye reads from left to right and will take in the person first, then drift up to the upper right.

Image

Observe the above group image. The eye running left to right again follows the gaze of the left most person. If he were looking to the left, the eye would rebel a little in proceeding further. (A lesson I’m learning in people photography is to usually have them looking into the larger space of the picture, if possible. I’m learning it very slowly and reluctantly.) We then move to the next person in the image who is looking back, sharing a joke. The eye is immediately caught however by the central dominating figure, and although he looks left, the eye then follows the neck of the double bass upwards to land on the first girl on the right. She looks directly at the viewer, and provides a visual pause to breathe a little. The girl on the right looking left then invites you to run over the enitre image again. Happily no arrangement of people was required, this was one of many photos I took on the night. But I could immediately sense it was the best of the crop and when you get into composition, you begin to find it easy to see why.

The ratio of elements don’t have to slavishly follow the rule of thirds so long as the items balance. Here in this photograph, we can see three elements – the people on the left, the counter in the middle and the man on the right:

Image

The fish counter takes up the entire width at the foot of the image and narrows to a point half way up in the distance. The eye is drawn in by this and the counter provides much needed depth. The people run along the left of the counter, and as the eye tracks it is able to take each of them in turn. Finally, the man on the right in his upright glum demeanour and light clothing provides a visual anchor and another resting point, a breathing space, for the eye.

Curves provide a deeply eyecatching guide to a photograph. The sweep of the railing slings the view up and towards the flamboyant bird on the beacon.

Image

The ultimate shot would however be for the railing sweep to be placed further right and for a low flying bird, or boat, to be spaced out on the left to complete the curve after a leap.

No matter the landscape, man made or natural, the rules tend to stay the same. Landscape gardening in the before-times was a 18th century craze that swept Europe, especially the stately palace gardens of France and England. It filled that strange craving for composition, for order out of chaos. Below we have a terrace garden:

Image

Again, note the lead in line. The near tree on the left a framing device, with the eye drawn in by the path and wall and the main image split into two triangles by the diagonal sweep of the blue sky horizon versus the garden. The striated shadows add further depth.

Image

By comparison this shot taken from Misery Ridge of Smith Rock State Park actually follows the same rules, despite the rough hewn and detailed nature of the shot. The eye follows the curved amphitheatre of rock to the darkly shadowed full stop upper right. The mist either side brings out this formation and adds depth and scale. The jutting rock in the foreground adds further depth, placing the viwer in the picture by giving them a viewing platform. The blue sky provides a place for the eye to retreat to and further scrutiny makes out a river nicely mirroring the curve of the cliff face.

You can still eke out rules of thirds and leading lines from even the most complex seeming of images. This jumble of poles and wires thanks to the road and darkened ground detail makes a coherent composition.

Image

Note how the crazy tilt of the left telegraph pole creates an invisible line aiding the vanishing point of the road leading you through and out to the dimly perceived buildings in the distance.

With portraits it’s best so simplify and even abandon all this trickery. The main subject should be the character of the person you see and not fancy tricks. However, the use of leading lines again can rest an eye pleasantly on the face and in candid shots lines and thirds can link people together, even with the gulf of a large empty middle space between them.

One important thing to remember in portraits however is to never, never have a dominant line intersecting the head or neck of your subject. This really ruins a portrait. You can get away it just if its deeply bokehed, but otherwise the mind just starts thinking on how that fence railing has impaled them in the ear and run out the other side. Don’t panic however about general lines of wall corners intersecting – as long as the background is distanced enough it’ll work.

Image

Here the mother is slightly framed by the wall mounted frame behind her, whilst the baby shares her space by virture of having the same general mass of background. Although a more unfussed shot would have been achieved without the coffee drinkers, brown wall and background elements behind them, the dominance of the subjects in the shot, the depth of focus and the warm colours make this a restful environmental portrait.

So we learn that the art of composition involves the linking of elements in a shot, be it by invisble lines or more direct means. We learn it through the partitioning of elements into thirds, primarily land, sky and sea with the subject assuming the point of interest. For further clues I strongly recommend the works of Stephen Shore and Henri Cartier Bresson. Their unfussy but banal composition makes high art of sometimes banal subjects.

One final point – don’t fuss about composition for every shot. If you see something but are pressed for time, quickly sweep-frame and click. Unlike composition, timing and opportunity cannot be created, they can only be harnessed. With luck (and more than half of photography is luck) your growing unconcious appreciation of composition will guide you without you even having to think in tic-tac-toe.

_________________
"Peter you've lost the NEWS!"

Bored? Why not look at some pretty pictures on my photography blog? Here: http://petetakespictures.com

Come & See My Flickery Pics Here: http://www.flickr.com/photos/nervouspete/


Top
 Profile  
 
 Post subject: Re: Nervy-Pete's Photography Class
PostPosted: Sat May 12, 2012 14:20 
User avatar
Skillmeister

Joined: 27th Mar, 2008
Posts: 27023
Location: Felelagedge Wedgebarge, The River Tib
Triple A plus. Would read again!

_________________
Washing Machine: Fine. Kettle: Needs De-scaling. Shower: Brand new. Boiler: Fine.
Archimedes Hotdog Rhubarb Niner Zero Niner.


Top
 Profile  
 
Display posts from previous:  Sort by  
Reply to topic  [ 53 posts ]  Go to page 1, 2  Next

All times are UTC [ DST ]


Who is online

Users browsing this forum: Majestic-12 [Bot], markg and 0 guests


You cannot post new topics in this forum
You cannot reply to topics in this forum
You cannot edit your posts in this forum
You cannot delete your posts in this forum
You cannot post attachments in this forum

Search within this thread:
You are using the 'Ted' forum. Bill doesn't really exist any more. Bogus!
Want to help out with the hosting / advertising costs? That's very nice of you.
Are you on a mobile phone? Try http://beex.co.uk/m/
RIP, Owen. RIP, MrC.

Powered by a very Grim... version of phpBB © 2000, 2002, 2005, 2007 phpBB Group.